OziExplorer
CE - Getting Started
Downloading
The links for downloading are on the OziExplorerCE web page.
You
must choose the correct link which best suits the PDA type you have.
In general PDA's are available in 2 types, Handheld PC's and PocketPC's
 |
Pocket PC - A PDA which basically looks
similar to the image on the left and is labeled as a Pocket PC. |
 |
Handheld PC - Any PDA using Windows CE
which is not a Pocket PC, it will be using the WindowsCE core operating
system. If your PDA does not use ActiveSync or Windows Mobile Device Center (Vista) then you must download the runtime version. |
Installation
For PDA's which use ActiveSync or Windows Mobile Device Center (Vista)
For PDA's which do not use ActiveSync or Windows Mobile
Device Center (Vista)
Download the Runtime zip file toy your PC. Unzip the zip
file and extract the contents to a memory card. The runtime consists of many
different folders with files in them, you must make sure all the folders and
files are extracted correctly so the folder structure is kept.
Put the memory card into your PDA, you must run
OziExplorerCE using the "File Explorer" and clicking on the
OziExplorerCE_arm.exe file.
Configuration
The Configuration option are on available on the "Configuration Menu" or on the
File Menu.
The demonstration maps and data files provided with OziExplorerCE can be used
without any configuration changes, when you want to use your own maps and data
files you will need to configure the "Map & Data Files" paths to point to where
your maps and data files are located.
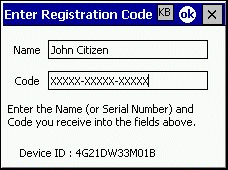
Entering License Codes
When OziExplorerCE is purchased you will receive a name and code to enter into
OziExplorerCE to unlock the program you have downloaded. The name and code must
be entered exactly as they are given.

GPS
Data Output Types
Most GPS receivers output standard NMEA data but a small number may output
other formats.
- Any GPS receiver with the standard NMEA 0183 output of the GPRMC or
GGA or GLL sentence will work with OziExplorerCE
- Any Garmin GPS which outputs garmin PVT data can be used with
OziExplorerCE
- SIRF Binary data output can also be read by OziExplorerCE (this is rare as
SIRF based gps receivers can also be set to output NMEA).
GPS Types
- Internal GPS Receiver
- Many PDA's also have an inbuilt GPS receiver, these can be used by
OziExplorerCE. In OziExplorerCE configuration you must specify the port the GPS
uses.The baud rate must be set to the rate the gps uses (normally (but not
always) 4800).
- External GPS Receiver
- A cable to connect the standard CE device serial cable to the standard GPS serial cable
is required. A diagram of how to wire this cable is in this document.
- Compact Flash GPS
- Compact Flash GPS receivers that plug into the compact flash slot of your
CE device.
- Bluetooth GPS Receiver
- All Bluetooth connected GPS receivers can be used with OziExplorerCE. The GPS
must be "paired" to the PDA using a serial port. In OziExplorerCE configuration
you must specify the port your PDA is using for bluetooth communication. The
baud rate must be set to the rate your gps uses (normally (but not always)
4800).
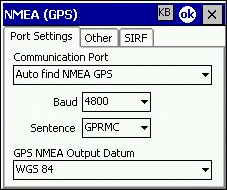
GPS Configuration Dialog

Baud - In most cases the baud rate will be 4800, but sometimes other baud
rates are used.
Sentence - Almost always GPRMC but if
GPRMC doesn't work consult the GPS specifications.
Program Navigation
The Menubar is used to move between pages.

 |
Show Options Menu - provides access to many
program features. |
 |
Previous Page - Shows the previous page. |
 |
Next Page - Shows the next page. |
 |
Extend Menu - Show / Hide an extended menu. |
 |
Open Map File - Shows the "Open dialog" to allow you to
select a map to open. |
 |
Start/Stop Moving Map Communication - Opens the com port and reads the NMEA
sentences from the GPS. |
 |
Page Menu - Show / Hide the Page Menu. |
 |
Main Toolbar - Show / Hide the Main Toolbar. |
 |
GPS Tracking - Turn GPS Tracking On / Off |
 |
Main Menu - Show / Hide the program menubar. |
 |
Dim Screen - Dims the screen brightness for night viewing. |
 |
Screen Lock - Locks the screen. To unlock the screen drag
the button on the "Slide to Unlock" bar to the right. |
 |
Quit - Close the program. |
Using Maps in
OziExplorerCE
- Just like PC OziExplorer, two files are required to use a
map in OziExplorerCE, the map image and the .map file. Both
files must be copied to the maps folder on the PDA.
- Maps come in various formats. You may need to convert your maps so they
can be used in OziExplorerCE. See the list below for how to use your maps in
OziExplorerCE -
- Map Image formats that OziExplorerCE can use are -
- OziExplorer formats (ozf2, ozfx3)
- ECW format (only on PDA's with ARM cpu's).
- Maps that can be converted to ozfx3 format for use in OziExplorerCE are -
- BMP, PNG, TIF, JPG, GIF, MrSID, ECW
- Mapping formats BSB, BSB 4, BSB 5, Maptech HDR and RML
- Kompass maps
- To convert the above maps, use the "Img2Ozf" program which
can be downloaded from this web site.
More information about
Img2Ozf.
If you do not have a (.map) file for your map,
see the section "How is the map file created" below.
Copying maps to the PDA
- Recommended method - Use the program
"Img2Ozf" (Version 3.0 or later) to copy maps to the PDA. (See the Img2Ozf
program help for instructions.)
- Alternate methods - If you copy the maps manually, when you copy the map image (.ozf2,
.ozfx3 or .ecw) to your CE device, you must also copy the (.map)
file for the map image. To copy the maps to the PDA -
- Alternate Method 1. - Connect your PDA to your computer and link it using Activesync.
Open Activesync / Explorer file manager and navigate to the folder on the PDA
where you want the maps stored. Use Windows Explorer to select the maps and
drag and drop them on to the folder in Activesync Explore.
- Alternate Method 2. - If you are storing the maps on a storage card and have a card
reader connected to your computer, use Windows Explorer to copy the maps to
the maps folder on your storage card.
Using a storage card on your device to store your maps
- You can place your maps on a storage card such as an SD or CF card.
The Img2Ozf (Version 3.0 or later) program "Copy maps to PDA" option can
do this.
- It is recommended that you place the (.map) file and the
map image together in the same folder, if you do this OziExplorerCE will
always be able to find the map image to load it.
- In OziExplorerCE configuration, make sure you set the Map File Path(s) to
the folder(s) on the storage card where you have placed your maps and tick the
Active box.
- If you place your image files in a different folder to the (.map)
files, the Image File Path(s) configuration settings must be set to match the path(s) where you have copied the map images.
- For more information on configuring OziExplorerCE, see the OziExplorerCE
Help or see the Map Searching FAQ link on the OziExplorerCE Support page on
this website.
How is the map file (.map) created
(PC OziExplorer is used to do this)
The map file can be created two ways using the PC OziExplorer. Both options
are items on the File Menu of OziExplorer.
- Import Map - There are maps and charts available in digital form which
have the calibration (georeferencing) for the map included either directly in the file or
provided as information in an additional file. Importing these maps reads the calibration
information from the map files and creates an OziExplorer map file.
- Load and Calibrate Map Image - When you calibrate a map which does not
have the calibration information discussed above, (such as a map you have scanned from a
paper chart), OziExplorer creates a (.map) file which contains the calibration information
and a link to the image you are using.
Additional Information
- Img2Ozf Help can be accessed from the Img2Ozf program.
Editing OziExplorerCE
Screens
The screens (pages) displayed by OziExplorerCE
can be changed by using the OziExplorerCE Screen Designer which runs on a
PC. A complete set of screens can be designed and copied to the PDA for use by
OziExplorerCE.
[
Home ]
[
OziExplorer ]
[
OziExplorerCE
] [
OziExplorer3D ]
[
Maps ] [
Utilities ]
[
Support ]
[
Links ] [
Future Changes ]
[
Information ]
[
Australian Page ]
[
Site Map ]


![]()